Saturday, April 23, 2016

Working with Compressed Data in HDFS

I needed to process a large amount of data stored on my machine drive. The data is stored in a single folder, which contains numbers of files. Each file is about few gigabytes. The total size of the data is 4.5TB uncompressed, and my machine hard disk drive is only 2TB.  Intutively, I can copy the data from the external hard disk to the HDFS, which is feasible. Such approach will consume at least 9TB if the number of replication in the HFDS is 2x.

The one might argue, "why should I care if the HDFS has a huge capacity?". The simplest answer to this consider the two following situation:
(1) The Hadoop cluster is shared between you and others, which makes everyone using the cluster compete for the HDFS resource. " This is my case."
(2) Suppose you have a small cluster and the size of  HDFS is smaller than the size of the data you need to process. Apparently, it is impossible to fit your data in a small cluster without compression.

 For the above-mentioned reasons, running Hadoop job on compressed data can save your resources, and keep your colleagues happy.

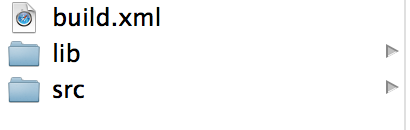
Now let's assume a couple of things first. You have massive data that do not fit in your single machine storage. The data are sliced into numbers of files. The following illustration shows the hieratical directory of the data.

----Folder
       | File
       | File
       | Nested Folder
                    | File 1
                    | File 1
       | File 1
       | File 1


First, I compressed the data files using .bz2 format. The size of the data after the compression is around 400GB.  Certainly now,  the data can easily fit in the machine hard disk, and most importantly copying the data to the HDFS will take about 2x of its original size (e.g., 800GB). I used the following script to compress and copied the data to the HDFS simultaneously. 

for i in $(`pwd/largeData/*`);
do
             bzip2 -c  "$i"
             hadoop fs -copyFromLocal "${i%}.bz2" /hdfsDir
done


Unfortunately, due to a power cut in my working area, all machines, and the Hadoop cluster was shutdown. Thus, I wrote another script to copy and compress the data if files does not exist on the HDFS. 

  1 #  Louai Alarabi - 02/15/2016
  2 #  check files recursively inside the current folder if they exist in the HDFS otherwise do the following
  3 # 1) Compress to the bz2  
  4 # 2) copy the compressed file to the HDFS 
  6 # 4) Finally after copy all the files it start the hadoop job
  7 #
  8 hadoop fs -mkdir /myHDFSdata
  9 echo " Check files in the target directory... "
 10 files=$(hadoop fs -ls /myHDFSdata/)
 11 for i in $(find `pwd` -name "*.txt");
 12 do
 13         filename=$(basename "$i" | sed 's/.txt//g')
 14         echo "$filename"
 15         if echo "$files" | grep "$filename";then
 16                 echo " $filename exist"
 17         else
 18                echo "$filename miss"
 19                echo "compress file $i"
 20                bzip2 "$i"
 21                echo "copy file to the hdfs $i"
 22                hadoop fs -copyFromLocal "${i%.bz2}/myHDFSdata/
 23         fi
 24 
 25 done
 26 echo " Done compress and copy the data to the HDFS"

Friday, March 11, 2016

Git working with Branch

There are numers reasons why somebody wants to create a new branch; for example, someone might need to add a new feature to the master branch without reflecting the changes to the master branch. Another reason could be fixing a bug and then merge the modifications to the master branch. Despite the reasons, here I will list main command lines you need to know to work with git branching as following

1- Show remote git URL:
$ git remote show origin 

2- Show git working branch:
$ git branch 

3- Create a new branch from existing one.
git branch <branchName>

4- Switch between branches.
$ git checkout <branchName>

5- To submit the newly created branch to the remote server, only for the first time. 
$ git push -u origin <branchName>

6- Later to submit any changes will be similar to operating with only one branch. 
$ git add --all 
$ git commit -m ' your message.' 
$ git pull 
$ git push 

7- To clone a specific branch
$ git clone -b <branch> <remote> 

8- To merge changes from one branch, e.g, <Fix> to the master branch. 

$ git checkout master
$ git pull origin master 
$ git merge fix
$ git add --all 
$ git commit -m "message "
$ git push origin master 
Example: 
$ git clone -b fixingBug louai@server/project/repository/projectName


Reference : https://git-scm.com/book/en/v2/Git-Branching-Branches-in-a-Nutshell

Wednesday, September 30, 2015

Create A Symbolic Link In Linux

    Since you came across this blog, this mean that you might want to know how to create a symbolic link in Linux using a command line.

    Let's take the following problem settings, suppose that you have a directory that is being used by many programs. For example, "~/.cache". Suddenly, the storage disk is full, then you need to make a decision of freeing space or either move the directory into another storage disk. Yet, the simplest solution is to use is to create a symbolic link. In favor to avoid making any changes to all program that use the "~/.cache" Folder.

1) Create a directory at the secondary storage.

% mkdir /storage/

2) copy the folder to the secondary storage.  

% cp -r ~/.cache /storage/

3) Remove the shared directory that you want to create a symbolic link for. 

% rm -rf ~/.cache

4) Create the symbolic link. 

% ln -s /storage/.cache  ~/


    By now you should find a symbolic link under your directory look like this " ~/.cache@". This means that you can navigate to the shared directory as usual without any effect. For instance, if you write cd ~/.cache then it will take you to /storage/.cache/


Another Example of why the one need to use a symbolic link. Suppose that you have a very long directory as this " /home/world/northAmerica/us/minnesota/saintpual/louai", then it is annoying to type this every time you use your computer. In this case a symbolic link sounds a wonderful idea.

Simply create a symbolic link in your home directory

% cd ~ && ln -s /home/world/northAmerica/us/minnesota/saintpual/louai ~/

Now when you can type only this to navigate to the folder.

% cd ~/louai

Monday, October 13, 2014

Apache Ant Tutorial:

In this tutorial you will learn about Apache Ant, Ant is a useful tools for compile and build your java program, most of IDE supports Ant either by opening Ant project or use Ant as it's build and compile code. This tutorial is very basic which let you get start using Ant, through this tutorial you will learn What is Ant, Why should you learn it, How to install it, How to create your fist Ant project, and How to open it by IDE.

What is Apache Ant?

Apache Ant is a java and command lines tools aim to build your java code with libraries and associated files as independent of any IDE. You can download Ant from Apache Ant website http://ant.apache.org/

Why should I learn Ant?

Programmers write their java code, usually with IDE "Integrated Development Environment" such as, NetBeans, Eclipse, or InteIIiJ IDEA.  Imagine a numbers of programmer would like to build a project together and use a git repository to push their changes. Supposing three programers, each prefers a different IDE. Ant isolate the code from the IDE,  and when programers push their changes all files associate with IDE will not be included in the git repository.


In short programers learn Ant for the following reasons:
  1. Not everyone in your team like the same IDE, somebody might prefers a different IDE.
  2. Settings might vary from one IDE to another.
  3. Build your target Jar with it's dependencies automatically
  4. You can automate the complete deployment : clean, build,  jar,  generate the documentation, copy to some directory, tune some properties depending on the environment, .... etc.
  5. Ant build and compile dependencies between targets.

Install Ant in your machine ?

1- Download ant from Apache Ant website  http://ant.apache.org/
2- Follow the instruction in http://ant.apache.org/manual/index.html
3- Don't worry if the instruction is confusing you. You can simply do the following steps 
4- copy ant to your /usr/bin/ directory 
5- copy ant libraries into /user/lib/ directory

How to build my program using Ant? 

Every project contains the following basic folders:
1- src - This folder contains all your package and source code
2: lib - contains all the externals libraries you used in your code


Now you need to create a build.xml file that contains instruction of your ant.  Here is a basic template I use for most of my project, you might need to manipulate it a little bit by changing the project name, software, and main class. I colored those properties in blue.

=================   build.xml  ====================
 
<?xml version="1.0"?>
<project name="ProjectName" default="main" basedir=".">
    <!-- Sets variables which can later be used. -->
    <!-- The value of a property is accessed via ${} -->
    <property name="src.dir" location="src" />
    <property name="build.dir" location="bin" />
    <property name="dist.dir" location="dist" />
    <property name="docs.dir" location="docs" />
    <property name="lib.dir" location="lib" />
    <property name="software" value="JavaSfotwre" />
    <property name="version" value="0" />
    <property name="mainClass" value="package.org.Main" />
   
    <!-- Create a classpath container which can be later used in the ant task -->
    <path id="build.classpath">
        <fileset dir="${lib.dir}">
            <include name="*.jar" />
        </fileset>
    </path>
   
    <!-- Deletes the existing build, docs and dist directory-->
    <target name="clean">
        <delete dir="${build.dir}" />
        <delete dir="${docs.dir}" />
        <delete dir="${dist.dir}" />
    </target>

    <!-- Creates the  build, docs and dist directory-->
    <target name="makedir">
        <mkdir dir="${build.dir}" />
        <mkdir dir="${docs.dir}" />
        <mkdir dir="${dist.dir}" />
    </target>

    <!-- Compiles the java code (including the usage of library for JUnit -->
    <target name="compile" depends="clean, makedir">
        <javac srcdir="${src.dir}" destdir="${build.dir}" classpathref="build.classpath">
        </javac>

    </target>

    <!-- Creates Javadoc -->
    <target name="docs" depends="compile">
        <javadoc packagenames="src" sourcepath="${src.dir}" destdir="${docs.dir}">
            <!-- Define which files / directory should get included, we include all -->
            <fileset dir="${src.dir}">
                <include name="**" />
            </fileset>
        </javadoc>
    </target>
   
    <!--Creates the deployable jar file -->
    <target name="jar" depends="compile" description="Create one big jarfile.">
        <jar jarfile="${dist.dir}/${software}-${version}.jar">
            <zipgroupfileset dir="${lib.dir}">
                <include name="**/*.jar" />
            </zipgroupfileset>
        </jar>
        <sleep seconds="1" />
        <jar jarfile="${dist.dir}/${software}-${version}-withlib.jar" basedir="${build.dir}" >
                <zipfileset src="${dist.dir}/${software}-${version}.jar" excludes="META-INF/*.SF" />
                <manifest>
                    <attribute name="Main-Class" value="${mainClass}" />
            </manifest>
        </jar>
    </target>

    <target name="main" depends="compile, jar">
                <description>Main target</description>
        </target>

</project>

===========================================


Compile and Build with Ant

Now open the terminal and type the following under the project folder 
$ cd <dir>/Myproject
$ ant 

You should see this in terminal otherwise there is something wrong in your code. 
BUILD SUCCESSFUL
Total time: 1 secon


  Open Ant project using eclipse IDE?

1-Open New project
2- Select Java Project from Existing Ant Buildfile
3- Select build.xml file 


Friday, March 21, 2014

Create Git repository in your local network

To Create git repository for your projects in your local network.

1- (Server) Go to the server machine.

2- (Server) Create a folder to be your repository. and move to the directory

$ mkdir louaiRepo
$ cd louaiRepo

3- (Server) Initialize the git repository using git command

$ git init

$ git config --bool core.bare true

4- (Your Local Machine) Move all your projects. inside this repository manually.

$ scp -r NetbeansProject louai@server:<dir>/louaiRepo/

5- (Server) add and commit using git

$ git add .

$ git commit -m "This is the first commit"

$ git push

6- (Your Local Machine) go to the directory that you wish to clone this repository, let's assume

$ cd~

$ git clone louai@server:<dir>/louaiRepo

7- (Local machine) now you can see the louaiRepo in the home directory. 

Thursday, March 13, 2014

Multiple Hadoop Job

    Map-Reduce paradigm is a different than traditional programming paradigm. In Map-Reduce processing is split in to two main phases called Map and Reduce. Apache typical example of word_count, which counts how often words appear in a documents. This will requires one map-reduce job. Intuitively, This is not the case in other tasks, You might need more than one map-reduce job to accomplish your task. Before, giving an example, I will discuss the main idea of Map-reduce paradigm briefly to create a basic background. let's assume the word_count example.

 Single Map-Reduce Job

    We have a document that contains several words, our task is to count how often each word appear. Map-Reduce paradigm takes the file and distribute it over your cluster. Basically it splits the whole file into chunks. Each chunk by default 64KB. Each splits goes through there phases Map, Shuffle "Combine" , and Reduce phase. Figure (1) illustrate the word count job.

Figure (1) word count map-reduce


A brief description of each phase:

1- Split: In hadoop file system "HDFS" the default block size is 64KB you can change this from the configuration. 

2- Mapper : The mapper process each split. Rather than consider the whole document. In mapper phase our input is a split. which is contains part of the document. In map phase we tokenize words in each line. As in HashMap structure <Key,Value> pair. We set each token "word" as the key, and assign it's value to 1.

3- Shuffler "combiner": Hadoop, sorts all similar keys together, to be passed to the reducer later.

4- Reducer:  reducer process each sorted split. In words count example, reducer calculate the number of words based on the given value.


Multiple Map-Reduce Job 
    
    Now it is easy to discuss several Map-Reduce job in order to complete your task. What do we really mean by several Map-Reduce job, is that once a first Map-Red finish the output will be an input for the second Map-Red and the output of the second Map-Red will be the result.
     Let's assume that we would like to extend the word count program. Let's assume that we would like to count all words in twitter dataset. So the first Map-Red will read twitter data and extract the tweets text. The second Map-Red is the wordcount Map-Red which analyze twitter and produce the statistics about it. " you can find the source code below " 

InputFile -> Map-1 -> Reduce1 -> output1 -> Map2 - > Reduce-2 -> output2 -> ....Map-x

   There are two several way to do this, I will present only one way of doing several Map-Red by define JobConf() for each Map-Red.

First create the JobConf object "job1" for the first job and set all the parameters with "input" as input directory and "temp" as output directory. Execute this job: JobClient.run(job1).
Immediately below it, create the JobConf object "job2" for the second job and set all the parameters with "temp" as input directory and "output" as output directory. Finally execute second job: JobClient.run(job2).

The source code to illustrate this example. 


    package MultipleJob;

import java.io.IOException;
import org.apache.hadoop.conf.Configuration;
import org.apache.hadoop.fs.FileSystem;
import org.apache.hadoop.fs.Path;
import org.apache.hadoop.io.IntWritable;
import org.apache.hadoop.io.LongWritable;
import org.apache.hadoop.io.Text;
import org.apache.hadoop.mapred.JobConf;
import org.apache.hadoop.mapreduce.Job;
import org.apache.hadoop.mapreduce.lib.input.FileInputFormat;
import org.apache.hadoop.mapreduce.lib.output.FileOutputFormat;
import twitter.Twitter;
import twitter.TwitterMapper;
import twitter.TwitterReducer;
import wordCount.WordCount;
import wordCount.WordCountMapper;
import wordCount.WordCountReducer;

/**
 *
 * @author louai
 */
public class Main {
    
  public static void main(String[] args) throws
      IOException, InterruptedException, ClassNotFoundException{
      System.out.println("*****\nStart Job-1");
      
        int result;
      
      JobConf conf1 = new JobConf();
        Job job = new Job(conf1, "twitter");
        //Set class by name 
        job.setJarByClass(Twitter.class);
        job.setMapperClass(TwitterMapper.class);
        job.setReducerClass(TwitterReducer.class);
        //Set the output data format
        job.setOutputKeyClass(Text.class);
        job.setOutputValueClass(LongWritable.class);
        job.setNumReduceTasks(0);
        
        Path input = args.length > 0 
                ? new Path(args[0]) 
                : new Path(System.getProperty("user.dir")+"/data/tweetsTest.txt");
        String outputPath = System.getProperty("user.dir")+"/data/hdfsoutput/tweets";
        Path output = args.length > 0 
                ? new Path(args[1])
                : new Path(outputPath);
        
        FileSystem outfs = output.getFileSystem(conf1);
        outfs.delete(output, true);
        FileOutputFormat.setOutputPath(job, output);
        FileInputFormat.setInputPaths(job, input);
        //return job.waitForCompletion(true) ? 0 : 1;
        result =  job.waitForCompletion(true) ? 0 : 1;
        System.out.println("*****\nStart Job-2");
        JobConf conf2 = new JobConf();
        Job job2 = new Job(conf2, "louai word count");
        
        //set the class name 
        job2.setJarByClass(WordCount.class);
        job2.setMapperClass(WordCountMapper.class);
        job2.setReducerClass(WordCountReducer.class);
        
        //set the output data type class
        job2.setOutputKeyClass(Text.class);
        job2.setOutputValueClass(IntWritable.class);
        
                Path input2 = args.length > 0
                ? new Path(args[0])
                : new Path(outputPath);

        Path output2 = args.length > 1
                ? new Path(args[1])
                : new Path(System.getProperty("user.dir") + "/data/hdfsoutput/filter");
        FileSystem outfs2 = output2.getFileSystem(conf2);
        outfs.delete(output2, true);
        
        //Set the hdfs 
        FileInputFormat.addInputPath(job2, input2);
        FileOutputFormat.setOutputPath(job2, output2);
         result =  job2.waitForCompletion(true) ? 0 : 1;
         System.out.print("result = "+result);
  }
    
}

Tuesday, February 18, 2014

Pass parameter to Hadoop Mapper

A typical example of word counts in hadoop, counts all keywords in file. let's assume that we have the following file contents:

Louai
Wael
Ahmed
Wael

If we run a typical example of word count "could be found in many websites"

/bin/hadoop jar wordcount /input.txt /output

The output of word counts will be
Louai 1
Ahmed 1
Wael 2

What if we would like to count only specific words in the input documents; for instance we would like to count only wael keyword. In order to accomplish this task we need to pass argument to hadoop mapper using -D command line, as in the following command line:

/bin/hadoop wordcount /input.txt /output -D parameter wael 

* First we need to add this code before the definition of the Job  :
 
//Set the configuration for the job
        Configuration conf = getConf();
        conf.set("parameter", args[4]);
        Job job = new Job(conf, "louai word count");

* Second we need to get  the passed parameter in the mapper :

String parameter = context.getConfiguration().get("parameter");

Well, let's see the code on github :https://github.umn.edu/alar0021/blogRepository/blob/master/wordCount/WordCount.java